- I. Upload code to Leanbot
- Step 6. Connect Leanbot to PC
- Step 7. Select the "Compile & Upload" icon
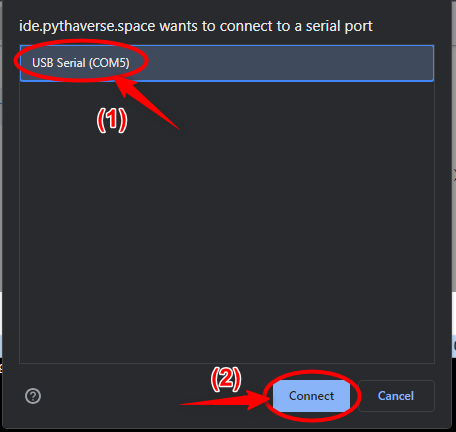
- Step 8. Select USB Serial (COMx) on your PC, click "Connect" to upload code to Leanbot
- Step 9. Successfully upload program code to Leanbot
- II. Connect Leanbot to PC via Bluetooth
- Step 1. Search for Bluetooth on your PC (personal computer)
- Step 2. Turn on the Leanbot robot
- Step 3. Search Leanbot ID (without BLE) and click "Pair"
- Step 4. Enter the passcode as: "1234" and click"Next" button to connect.
- Step 5. Successfully connect Leanbot robot to PC via Bluetooth
- Step 6. How to verify the Port (COMx) before connecting Leanbot to the PC Gateway
- III. Connect Leanbot to PC Gateway for data transmission
- IV. Experience Leanbot Digital Twin
- Step 1. Prepare
- Step 2. Click "Run" at the mission practice screen on PLearn page
- Step 3. Wait for the system to check the connected devices
- Step 4. Robot runs mission on the Leanbot Digital Twin
- Step 5. Place the robot at starting point A and go to Step 5
- Step 6. Run Leanbot robot on Digital Twin
- Step 7. Leanbot robot completes the mission
- The final step is confirming mission completion
Updated on October 16, 2023
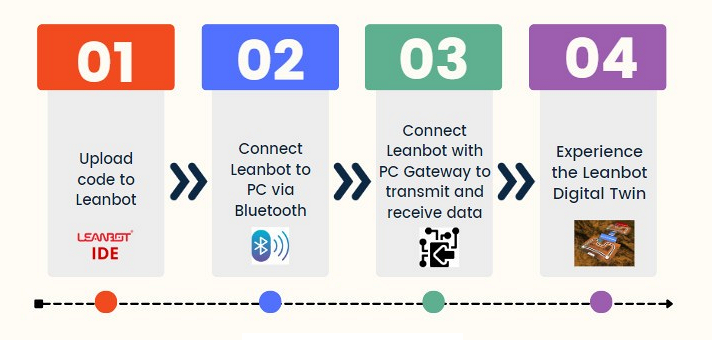
To experience Leanbot Digital Twin, you need to grant Leanbot permission to connect to the Internet for transmitting and receiving data related to Leanbot’s activities within the system. To achieve this, you can follow this Using PC Gateway tutorial (DO NOT use Android Gateway app).
Here are detailed instructions on how to use Gateway PC:
The steps include:
I. Upload code to Leanbot #
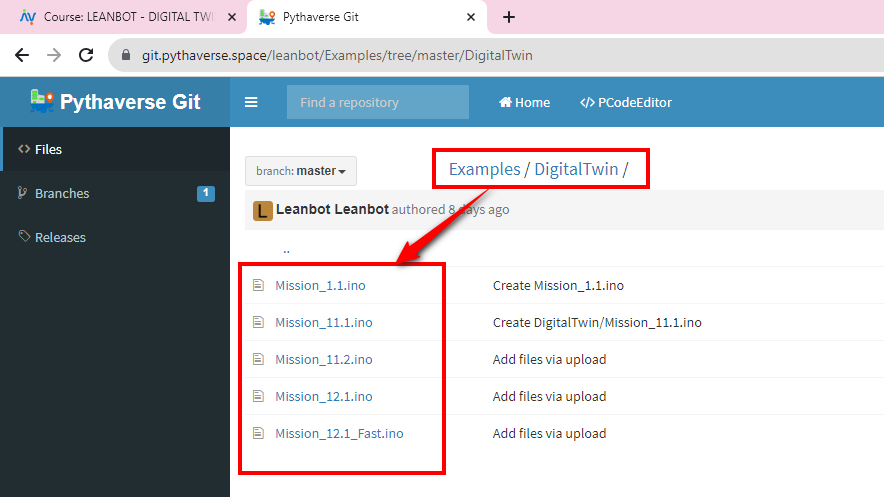
Step 1. Visit the PGit page to go to the DigitalTwin folder #
- On PGit, click on leanbot/Example/DigitalTwin folder.
- Here, you will find program codes for experiencing Leanbot Digital Twin.
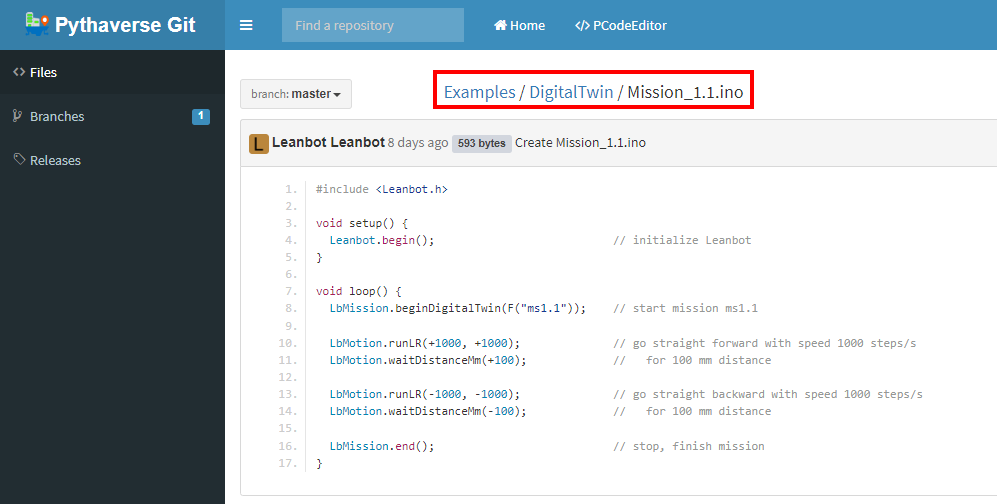
Step 2. Double-click to open a mission file #
For example, select the “Mission_1.1.ino” file
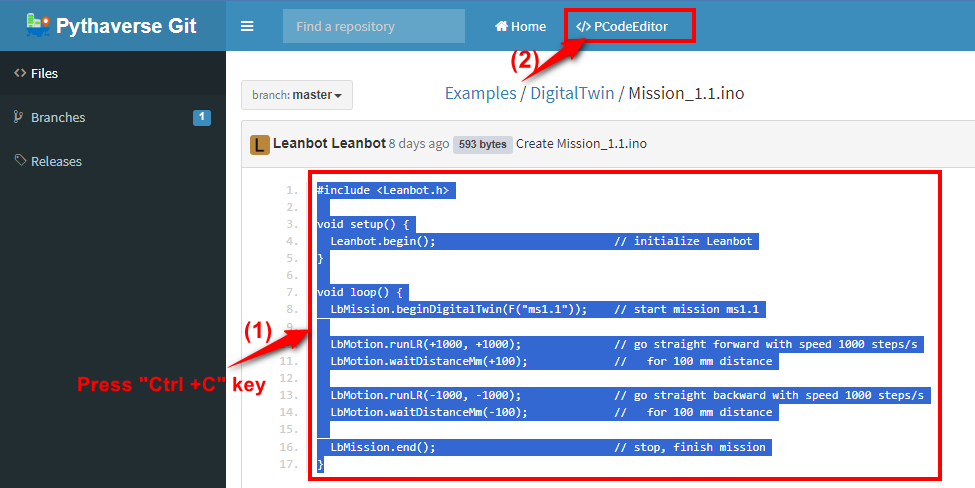
Step 3. Copy all program code, click “PCodeEditor” to redirect to PIDE page #
- (1) Select all program code and press “Ctrl+C” key to copy
- (2) Click “PCodeEditor” to redirect to PIDE page
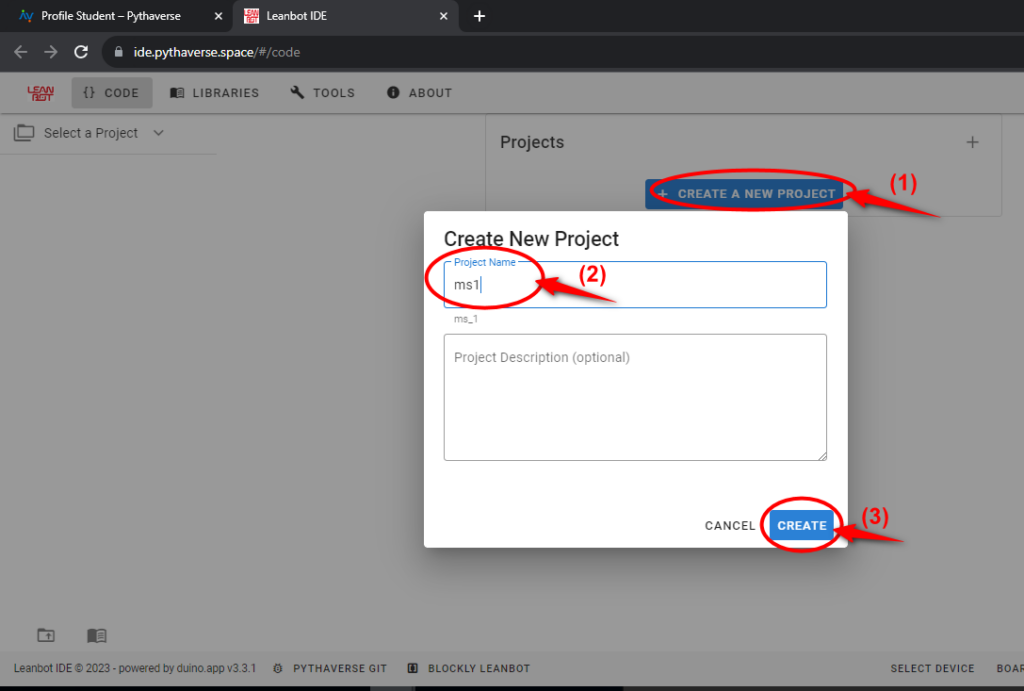
Step 4. Create a new project on PIDE page #
- (1) Click “CREATE A NEW PROJECT” button
- (2) Input your project
- (3) Click “CREATE” button
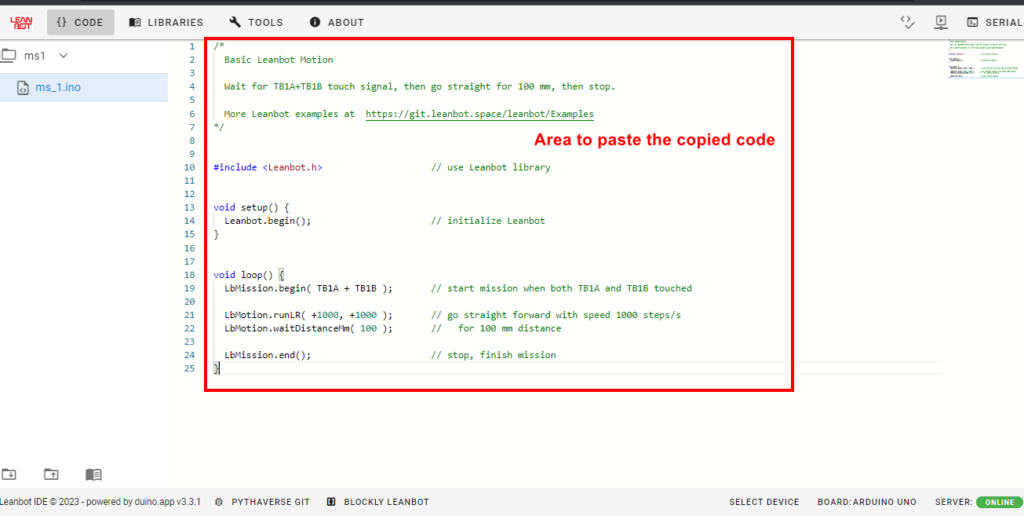
Step 5. Press “Ctrl+A” and “Ctrl+V” keys at ‘area to paste the copied code’ #
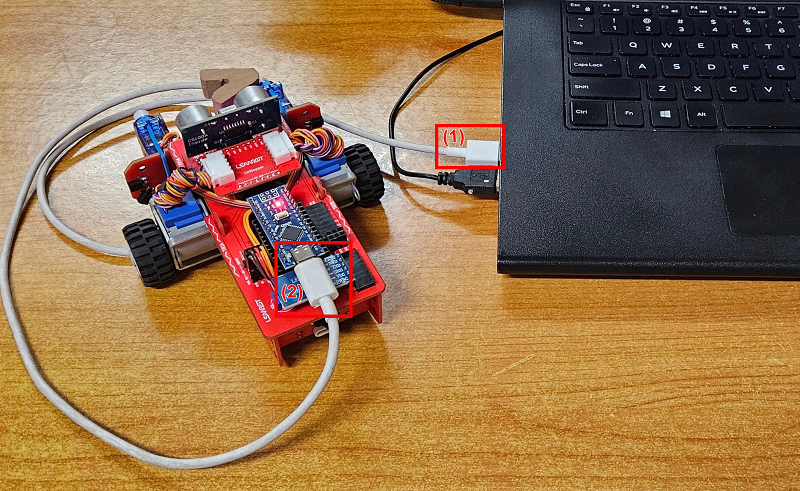
Step 6. Connect Leanbot to PC #
Using a USB cable to connect Leanbot to PC.
Note: It is recommended to turn Leanbot on before connecting to the computer.
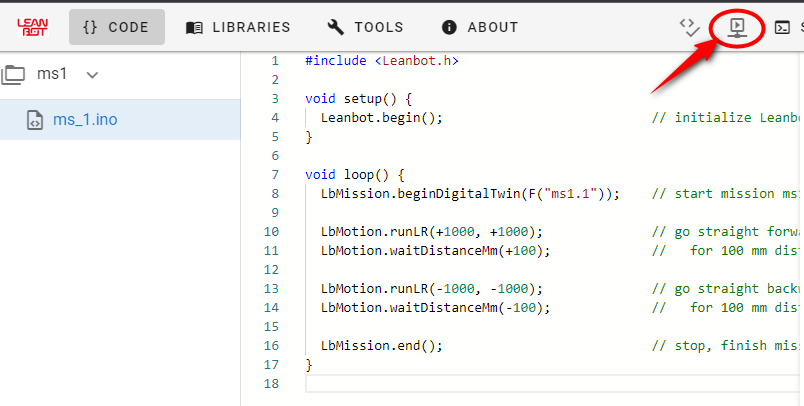
Step 7. Select the “Compile & Upload” icon #
Step 8. Select USB Serial (COMx) on your PC, click “Connect” to upload code to Leanbot #
Step 9. Successfully upload program code to Leanbot #
- Icon (1) displays when Leanbot is successfully connected to the PC via USB cable.
- Receive a notification when the code upload is successfully completed, it will display “100% – Done!”(2).

II. Connect Leanbot to PC via Bluetooth #
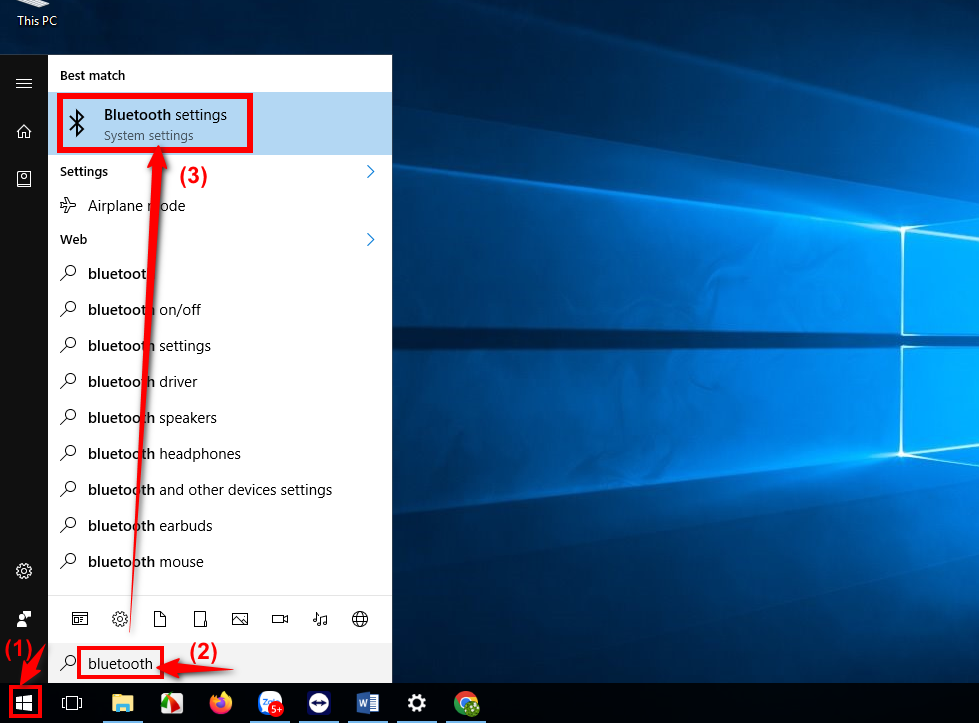
Step 1. Search for Bluetooth on your PC (personal computer) #
- On your PC, Click on the ‘Start’ menu-> Enter key ‘Bluetooth’ to search -> then select “Bluetooth and other devices settings“.
- For example, Bluetooth settings on Windows 10 Pro.
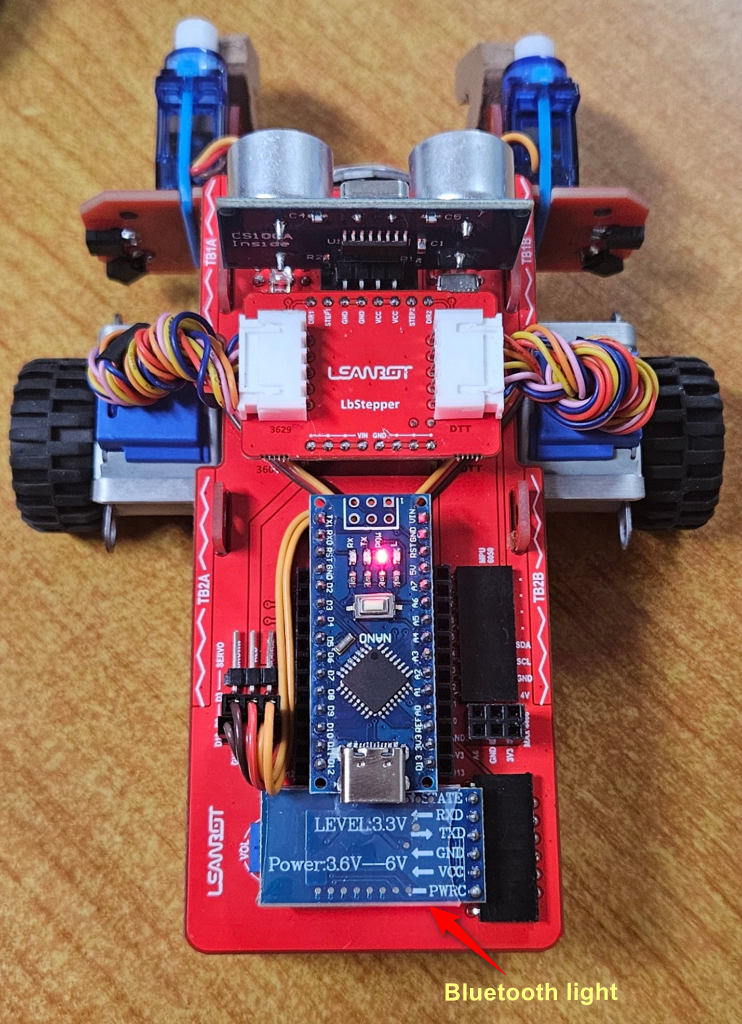
Step 2. Turn on the Leanbot robot #
When the robot is turned on, you can see the Bluetooth light on the robot blinking.
Step 3. Search Leanbot ID (without BLE) and click “Pair“ #
- Select Leanbot ID (without BLE) and click “Pair“.
- For example, select Bluetooth connection with ‘Leanbot ID‘ as Leanbot 157163. Do not select Leanbot 157163 BLE.
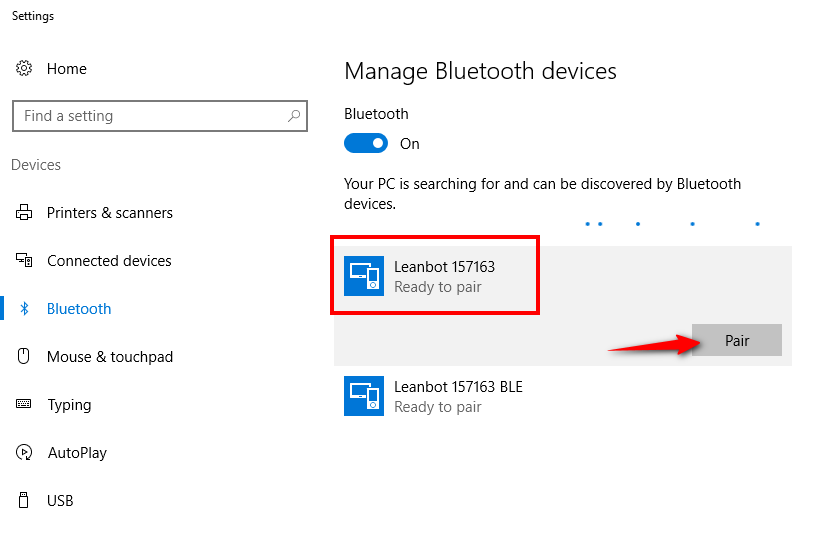
- Verify your Leanbot ID (as shown in the image below)
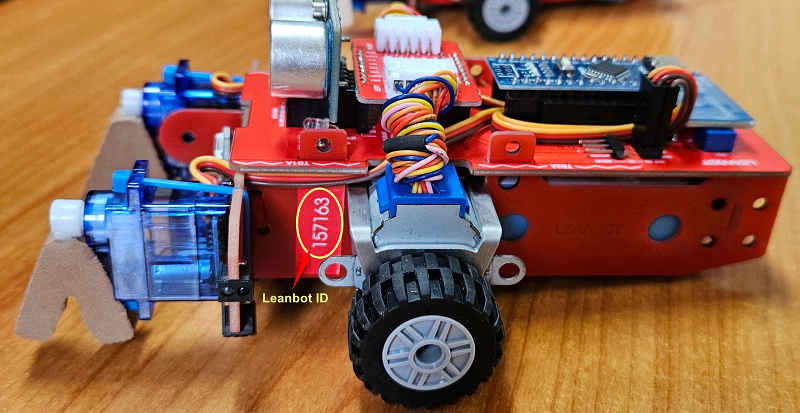
- Each Leanbot is assigned a unique Leanbot ID.
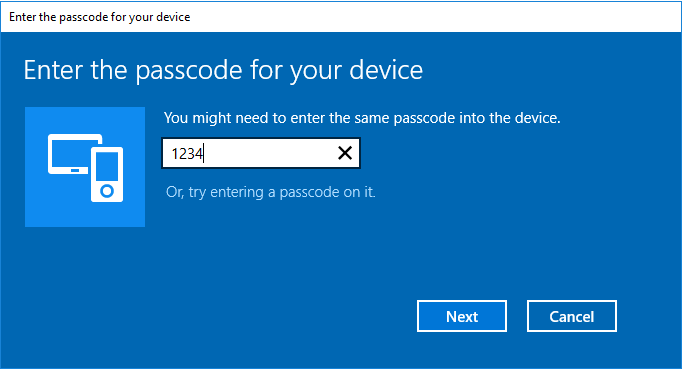
Step 4. Enter the passcode as: “1234” and click“Next“ button to connect. #
Step 5. Successfully connect Leanbot robot to PC via Bluetooth #
When Leanbot robot is successfully connected to the computer via Bluetooth, and it will display “Connected“.

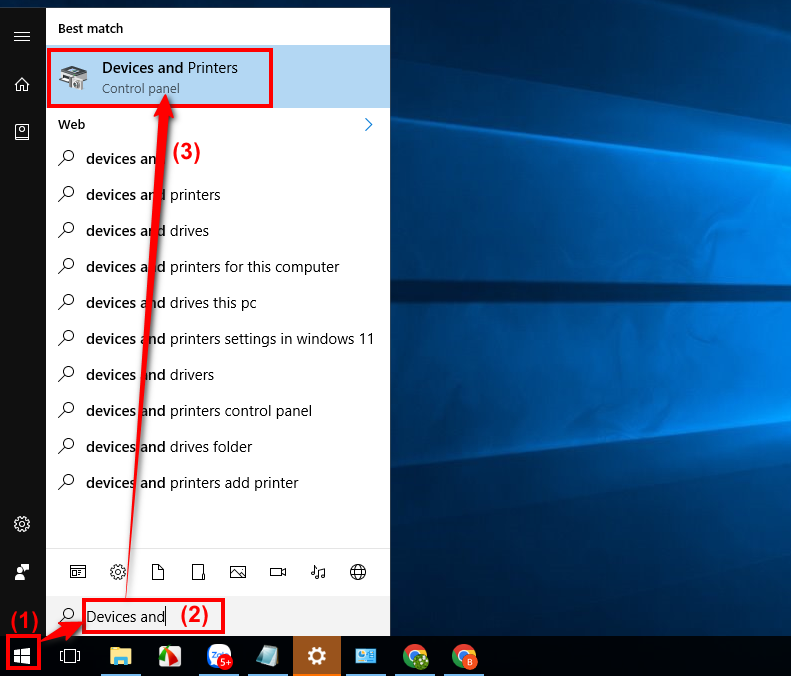
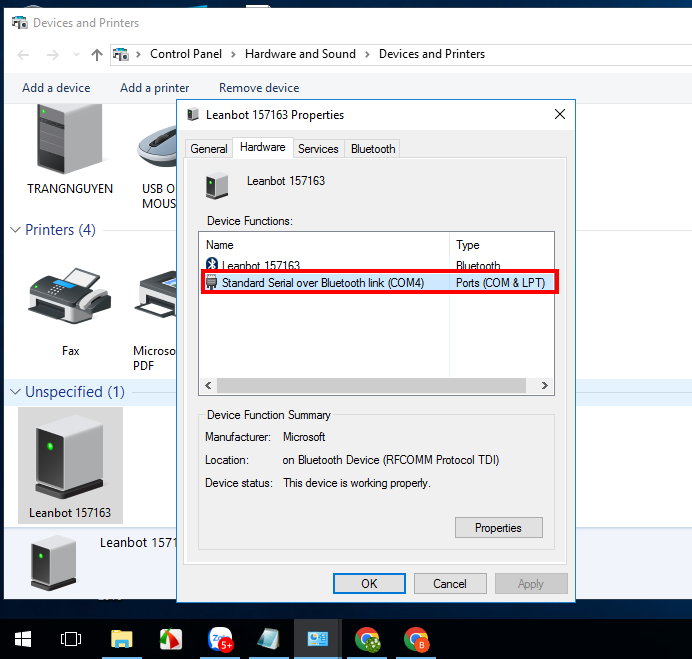
Step 6. How to verify the Port (COMx) before connecting Leanbot to the PC Gateway #
- Search for “Devices and Printers“
- The example image is on the Windows 10 Pro operating system.
- Double click on the Leanbot ID icon.
- For example, Leanbot has ID 157163.
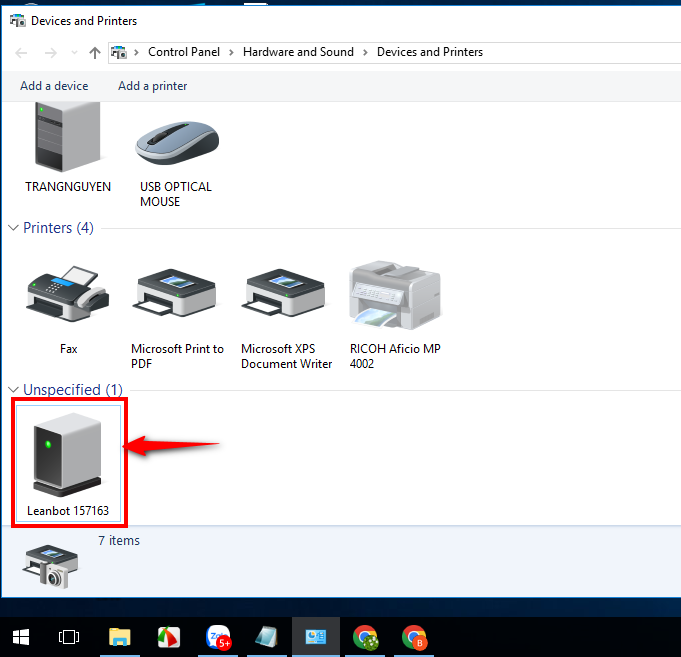
- You will rely on the COM port found on your computer and use it to connect to PC Gateway.
- For example, Leanbot uses Port (COMx) to connect to the Gateway, and in this case, it’s Port (COM4).
III. Connect Leanbot to PC Gateway for data transmission #
Step 1. Access to the Gateway #
There are 2 ways as follows:
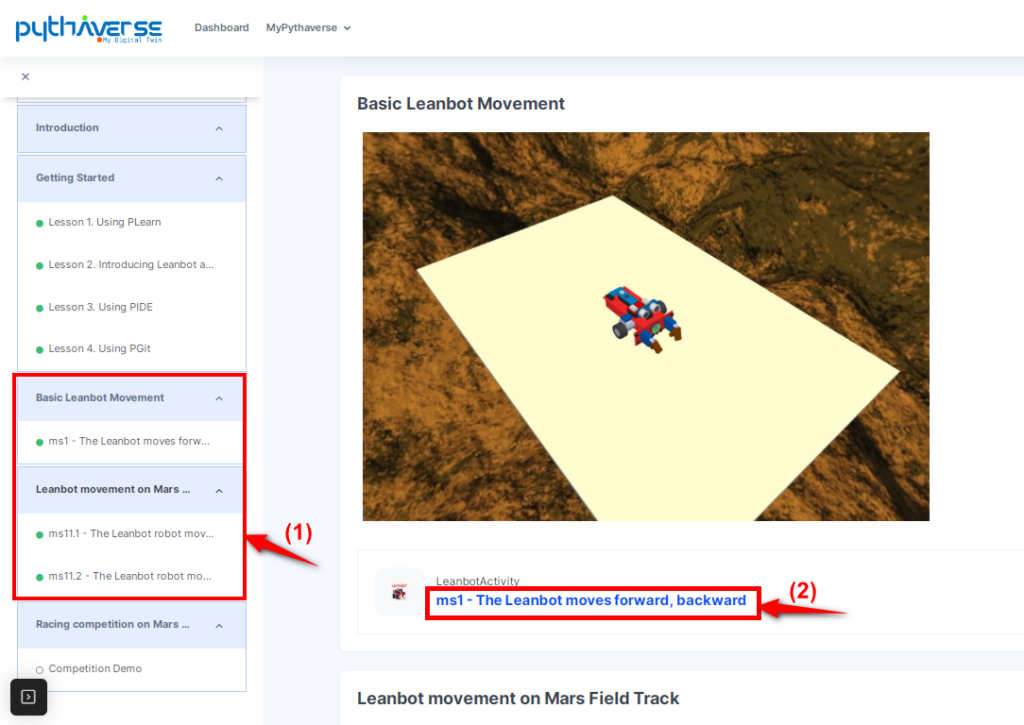
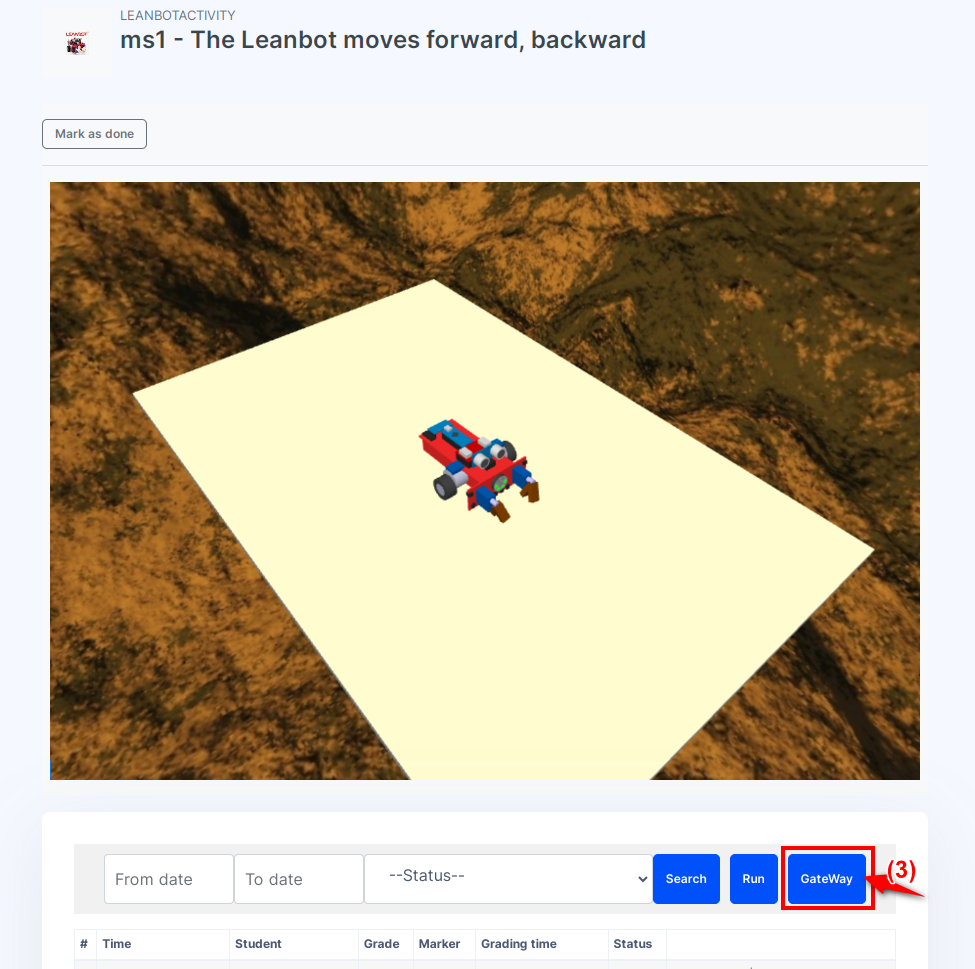
- Option 1: Access LEANBOT – DIGITAL TWIN DEMO course on PLearn page.
Open the lesson to perform the mission on Leanbot Digital Twin, then click on “Gateway” button on the mission screen.- For example, ms1 – The Leanbot moves forward, backward.
- On the left menu, select a mission.
- Left-click to open it.
- Then, click the “Gateway“ button.
- Other missions are also performed similarly to ms1.
- For example, ms1 – The Leanbot moves forward, backward.
- Option 2: Access to the Gateway
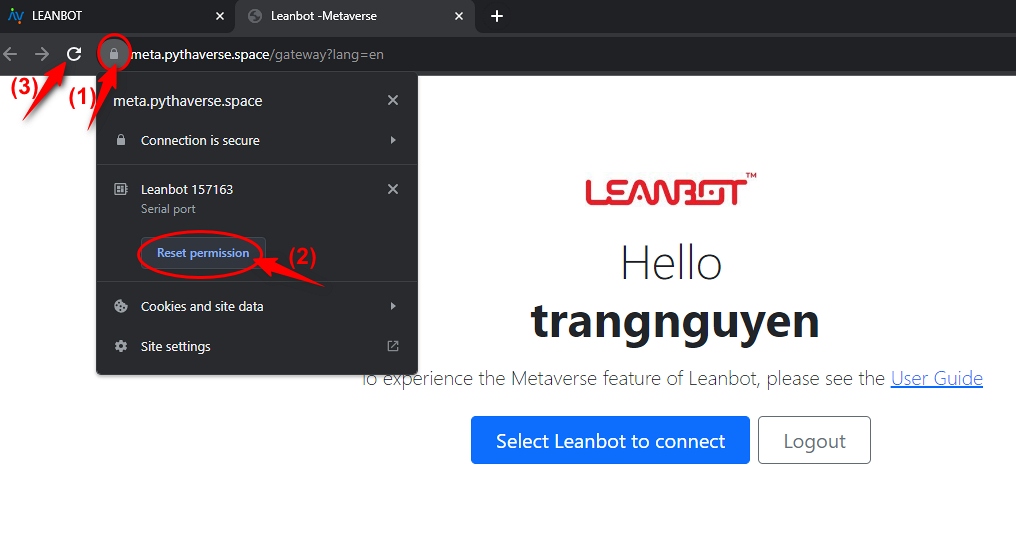
Step 2. (Only if you experience Chrome crashing) Reset permission on Chrome browser #
- Do not select Leanbot ID, because this will lead to Chrome crash
- In case Leanbot ID is selected by mistake (in step 4), please correct the mistake by following these ‘Reset permission’ steps:
- Click on the “Lock” icon (1). For example, Leanbot ID is Leanbot 157163
- Then click the “Reset permission” button (2)
- Go to Step 3.
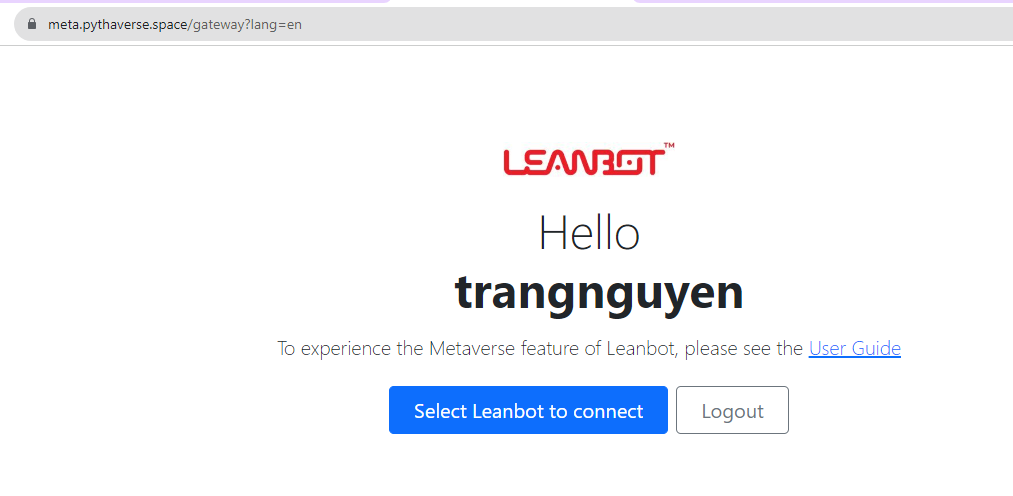
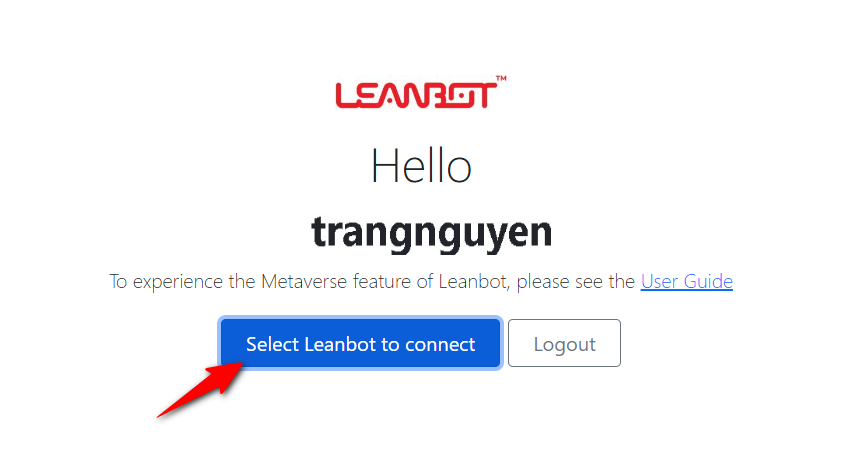
Step 3. Click the “Select Leanbot to connect” #
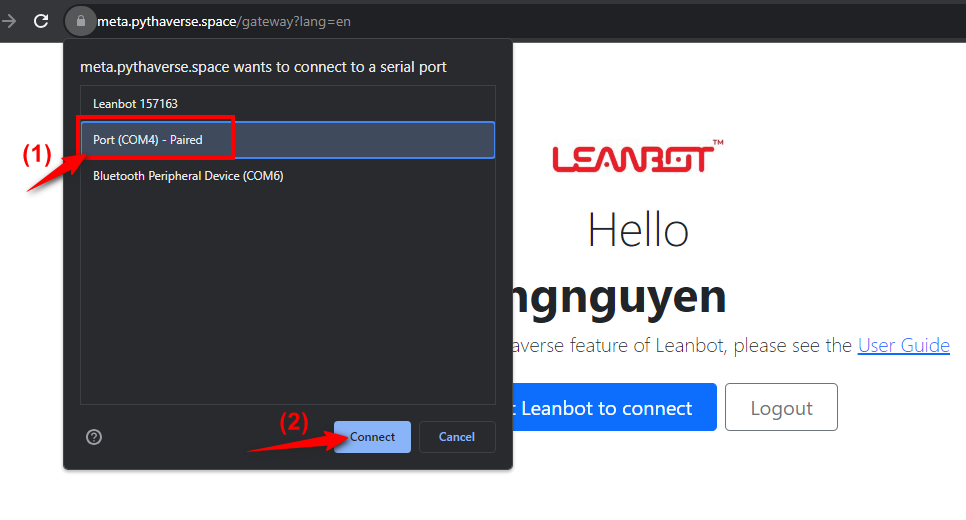
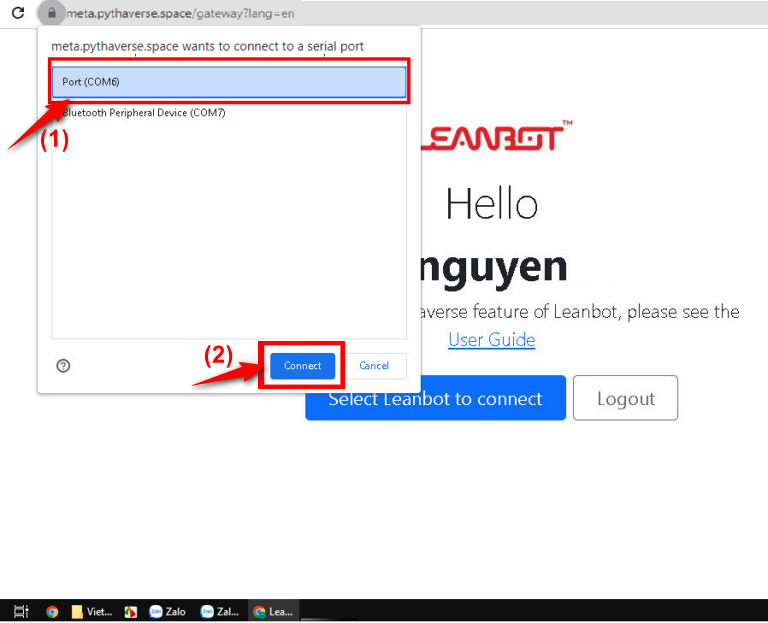
Step 4. Select a connection Port (for robot connected on PC via Bluetooth) #
- Select the correct Port (COMx). There are various COM ports available depending on your computer.
- Then click “Connect”.
- DO NOT select Leanbot ID. If you select it incorrectly, repeat Step 2.
- Example 1: as shown in the picture, the Port (COMx) corresponds to Port (COM4). This image is used on Chrome browser version 117.0.5938.134 or higher.
- Example 2: the port (COMx) corresponds to Port (COM6). This image is used on older versions of Chrome browser.
Step 5. Connect Leanbot to Gateway for successful data transfer #
- The Bluetooth light stops blinking when the Gateway connection is successful
- During the experience, if the robot is disconnected, the Bluetooth light on Leanbot robot is blinking, you need to reload this page and repeat steps from Step 2 to Step 5.

IV. Experience Leanbot Digital Twin #
Step 1. Prepare #
To experience Leanbot Digital Twin, you must use the following codes to upload to Leanbot, then access LEANBOT – DIGITAL TWIN DEMO course on PLearn.
Step 2. Click “Run” at the mission practice screen on PLearn page #
– Example 1 with mission “ms1.1“ #
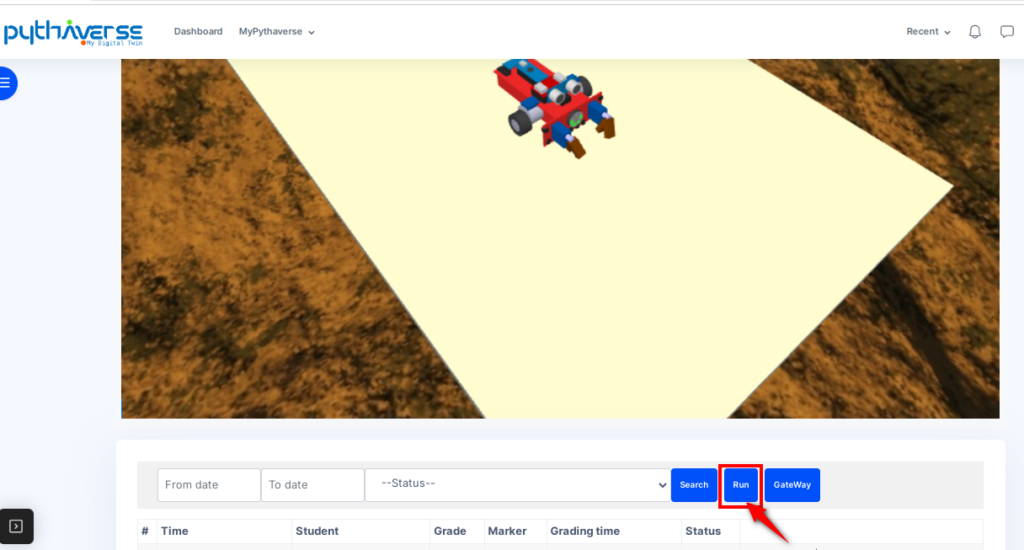
– With mission ‘Leanbot movement on Mars Field Track‘ as “ms11.1″, “ms11.2” also does the same. #

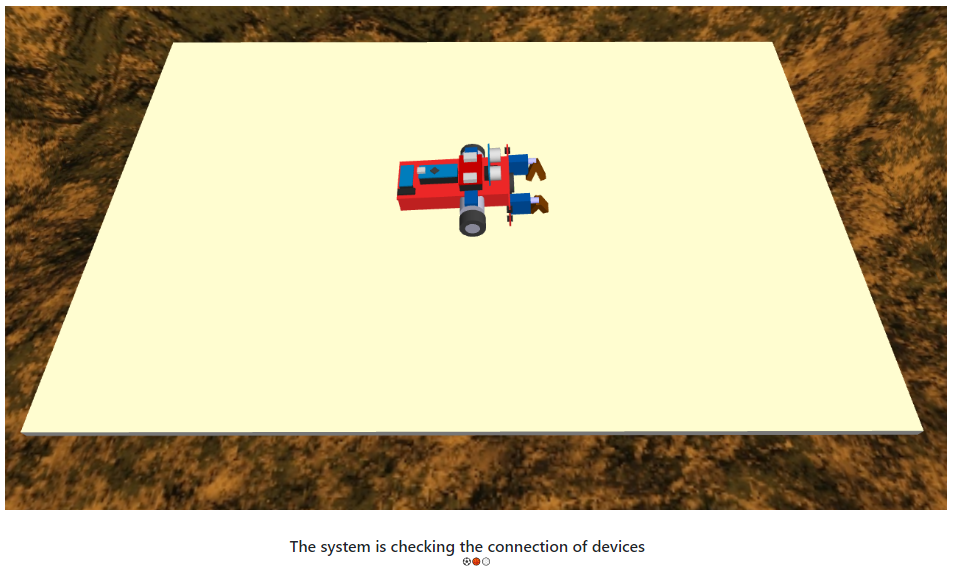
Step 3. Wait for the system to check the connected devices #
– Example 1, mission “ms1.1” #
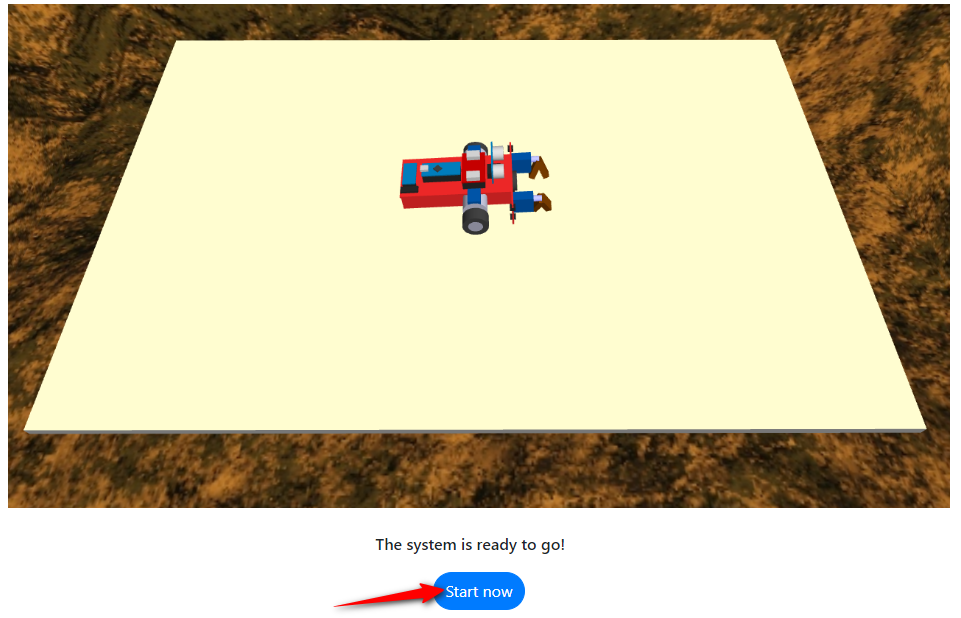
Click “Start now” button to begin.
– With respect to mission ‘Leanbot movement on Mars Field Track’ as “ms11.1”, “ms11.2” performs the same action. #
Step 4. Robot runs mission on the Leanbot Digital Twin #
– With mission “ms1.1” move forward and backward #
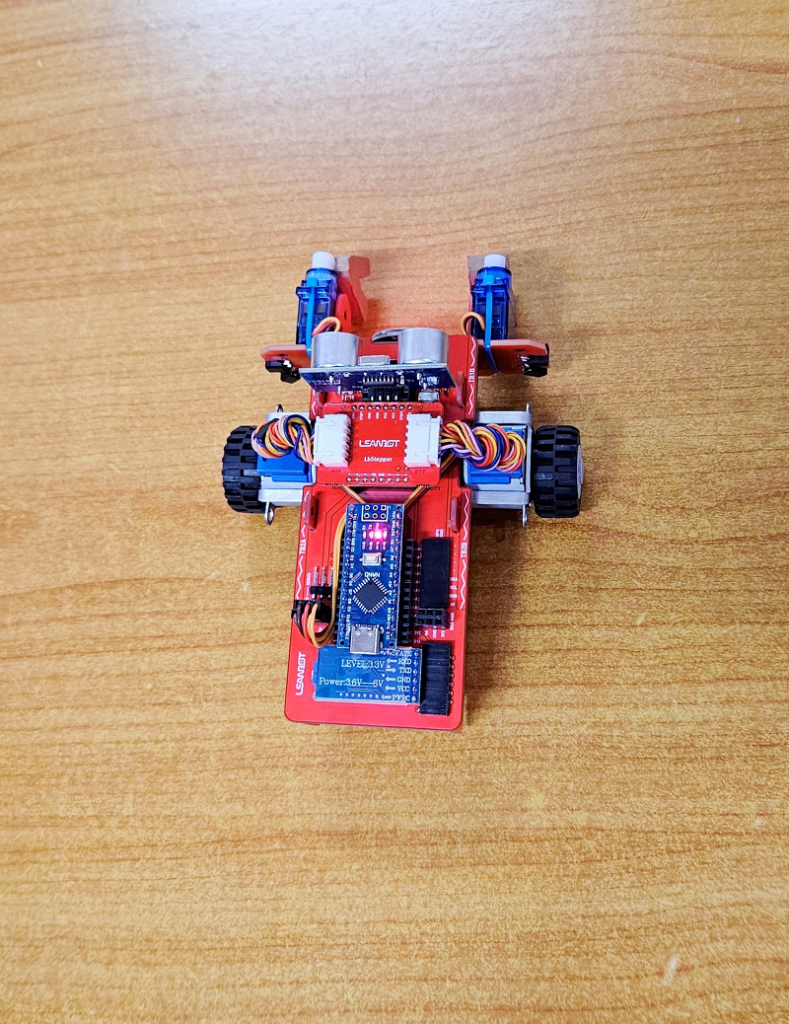
- Place the robot on a flat table.
- Then, go to Step 5
– With missions Leanbot movement on Mars Field Track as “ms11.1” or “ms11.2” moving along the black line #
- The Leanbot robot must first learn to recognize black and white lines on the Mars fieldtrack.
- Next, go to Step 4
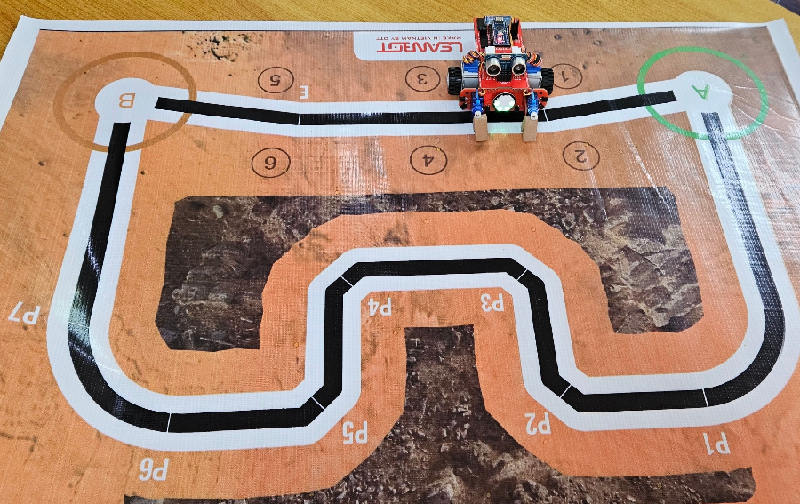
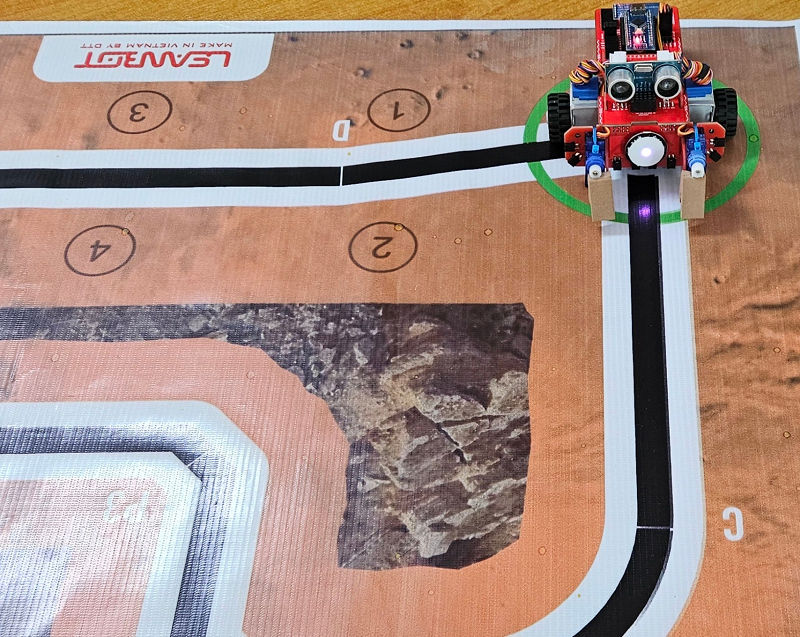
Step 5. Place the robot at starting point A and go to Step 5 #
- All experience missions perform this step.
- Regarding the mission ms1, you can choose whether to use the Mars fieldtrack or just do it as Step 4. After that, continue to Step 5, and the robot will execute the mission.
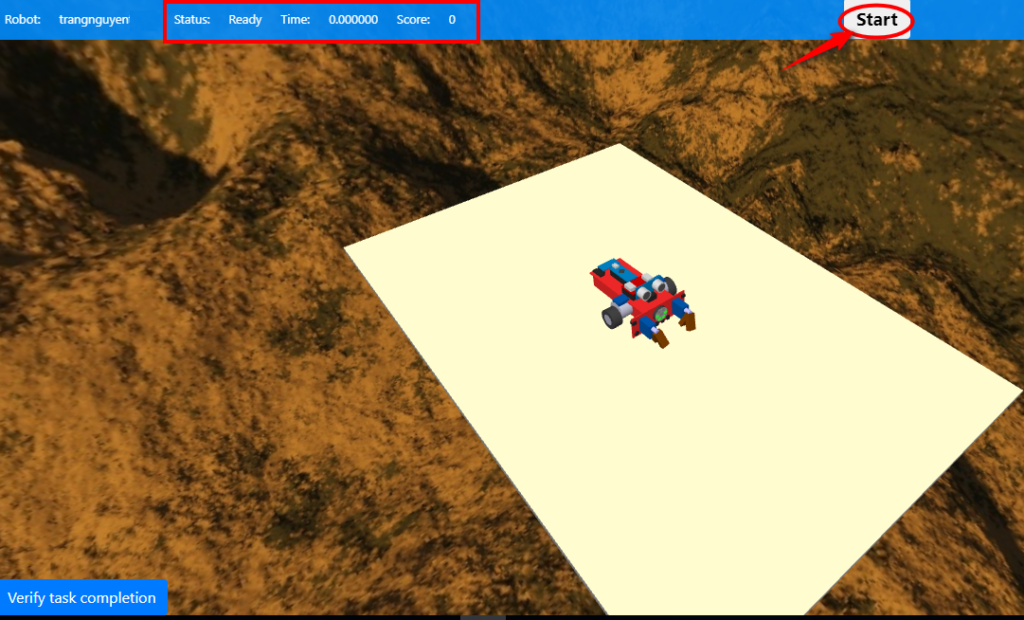
Step 6. Run Leanbot robot on Digital Twin #
The Digital Twin screen displays the following information: Status: Ready, Time: 0.000000 and Score: 0, then click the “Start” button to begin.
Note: To guarantee the robot transmits accurate data, only click the “Start“ button when all the above information (Status, Time, Score) is displayed.
– Example 1 with mission “ms1.1” #
– With mission Leanbot movement on Mars Field Track “ms11.1”, “ms11.2” #
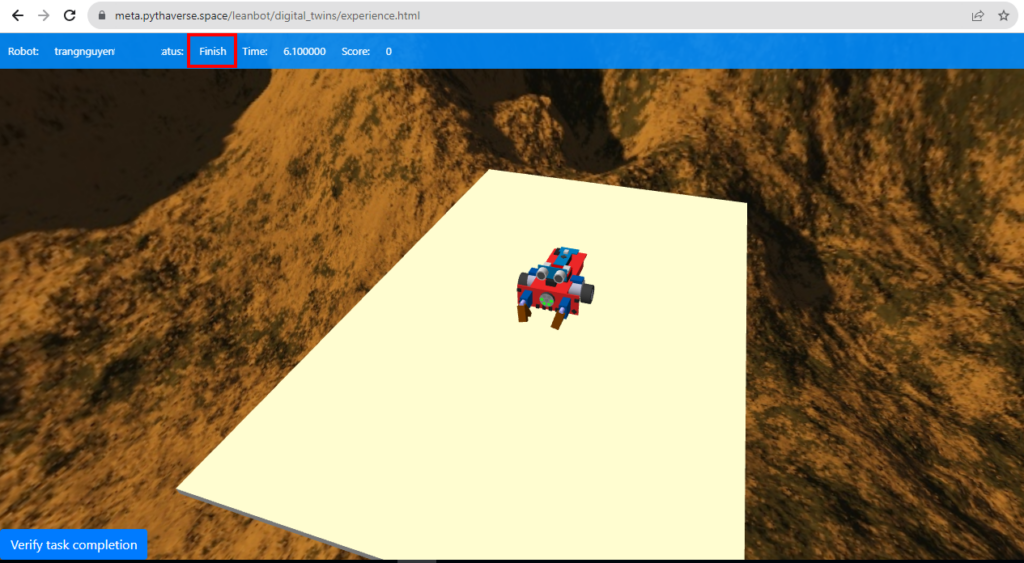
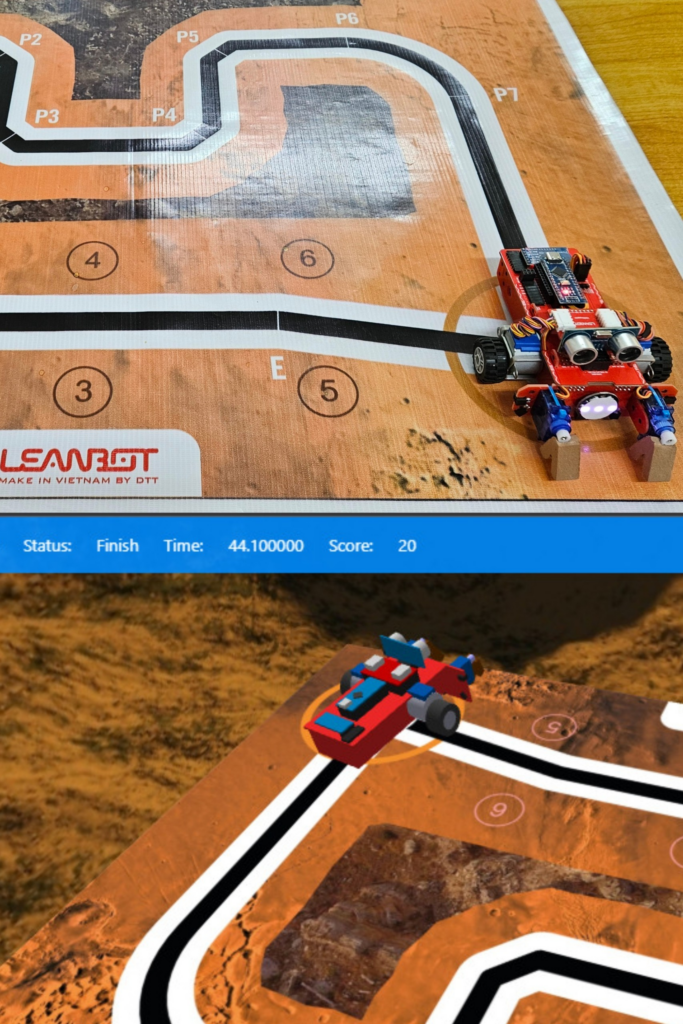
Step 7. Leanbot robot completes the mission #
When Leanbot robot completes the mission, the updated status is Finish.
– Example 1 with mission “ms1.1” #
– Example 2 with mission “ms11.2” #
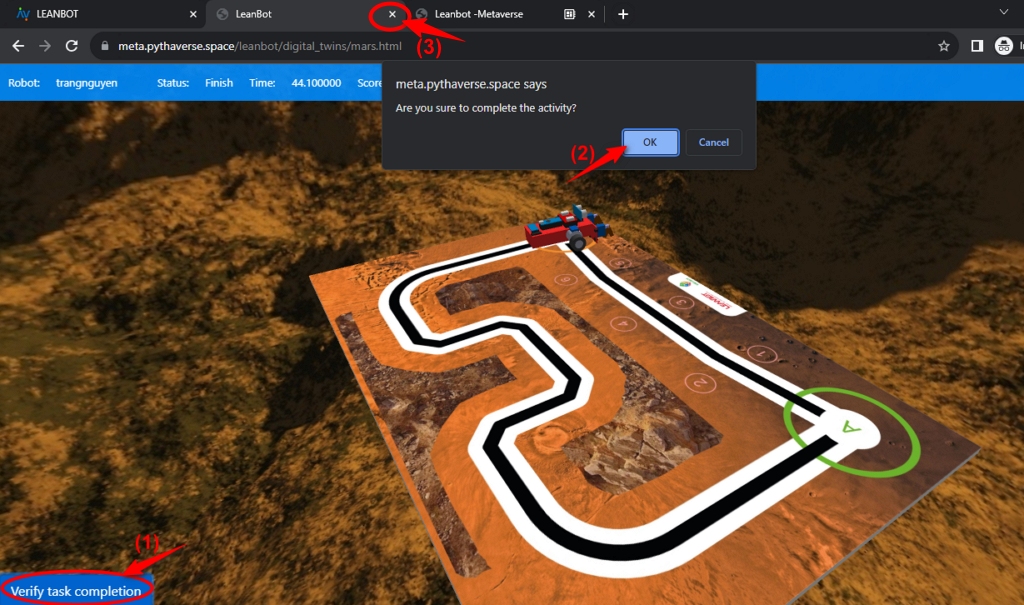
The final step is confirming mission completion #
- To confirm mission completion, click “Verify task completion” (1), click “OK” (2) and close the tab (3) on the browser screen to conclude the mission.
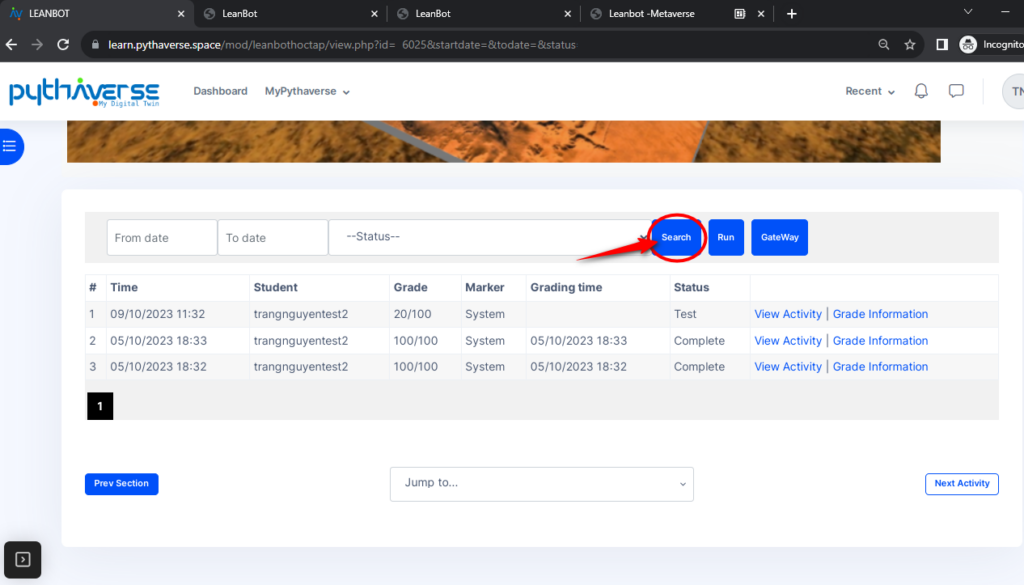
- At the mission screen on PLearn, search for robot activities by clicking the “Search” to find recently executed robot activities
Note:
– You need to follow the above steps correctly to join in the Leanbot Digital Twin experience.
– DO NOT turn off the Leanbot robot.
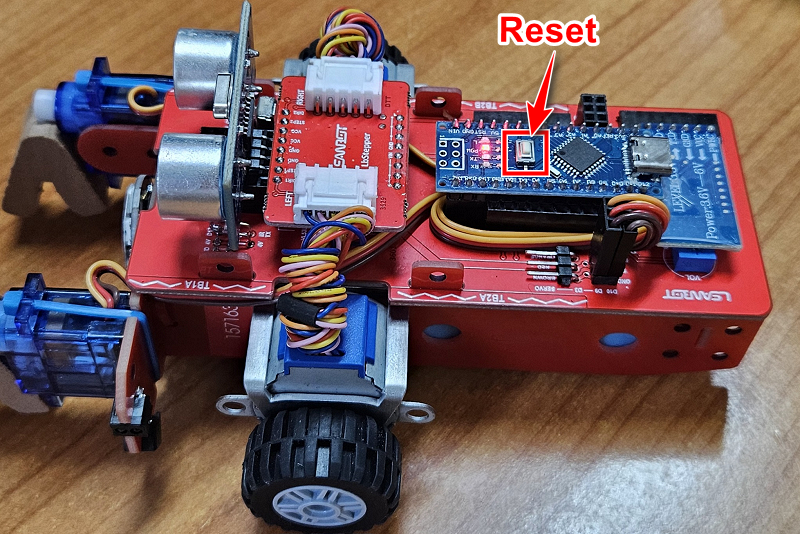
– If you wish to run a mission again, you can “Reload this page” after completing Step 7, then press the “Reset“ button on the robot and follow the instructions in Step 6
- Reload this page to run a mission again.
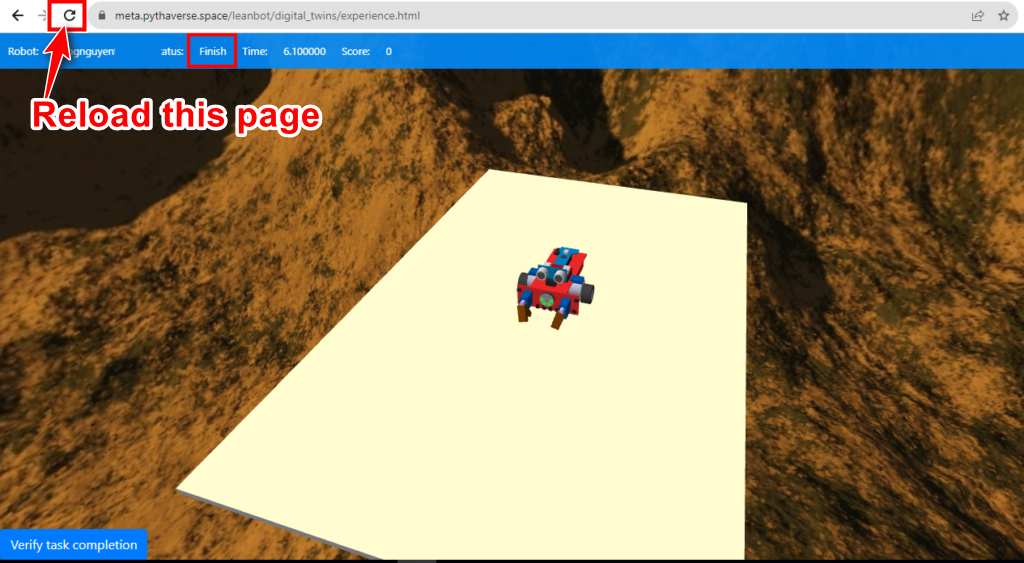
- Reset Leanbot robot. DO NOT turn off the robot.
Pythaverse Team.